
How to plan a gallery wall (four layouts that always work)
By Amy Byrne · · 7 min read
A gallery wall is not a random cluster. Four layouts, the spacing that makes them work, and the paper-template trick that means you only drill once.
A gallery wall looks effortless and is almost never accidental. Every good one is built on a layout, consistent spacing and one thing tying it together.
Pick a layout first
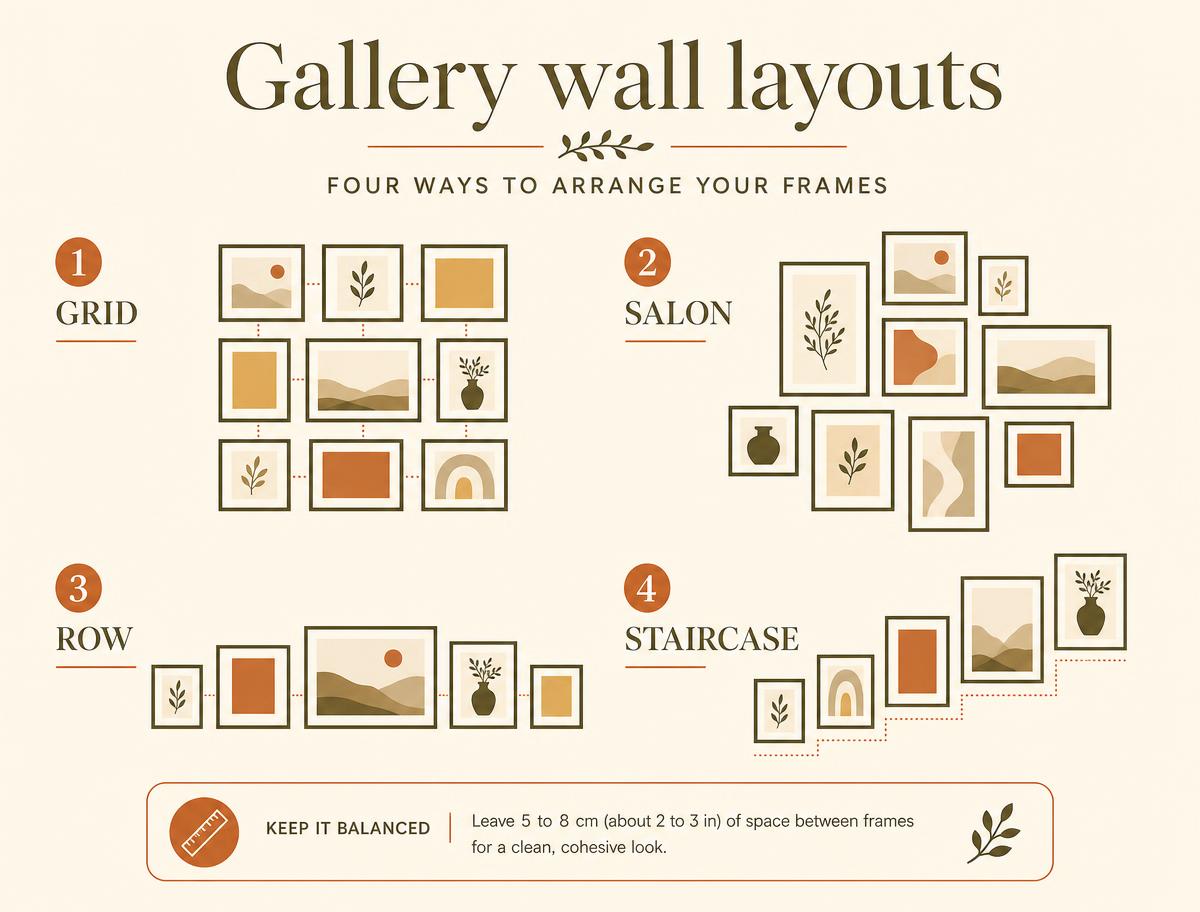
Grid. Identical frames, identical spacing, in rows and columns. Formal, calm, very forgiving — it is the layout I recommend to anyone doing this for the first time. Six 8×10″ prints in a 3 × 2 grid is a classic.
Salon. Mixed sizes packed around a central anchor piece. Lively and collected-looking, but it needs planning on the floor first.
Row. A single horizontal line, all centres on the same axis. Perfect for a hallway or above a long sideboard.
Staircase. Frames climbing at the pitch of the stairs. Use three to five pieces and keep the gap between them constant.
Spacing is the whole trick
Leave 5–8 cm between frames and keep it identical everywhere. Tighter than 5 cm looks cramped; wider than 8 cm and the group falls apart into separate pictures. Small prints sit at the tighter end, large framed pieces at the wider end.
Treat the whole arrangement as one big picture: its combined centre should still land at 145 cm from the floor, or 15–25 cm above a sofa back. There is more on that in how to hang a picture properly.
Give it one common thread
A gallery wall needs one thing repeating. Choose one:
- One frame finish — all oak, or all black — with varied images.
- One subject — all horses, all dogs, all Irish landscape.
- One treatment — all black and white. Any print in the shop can be made as a black-and-white edition at no extra cost, which is the easiest way to unify a mixed set.
Two of the three is even better. Three of the three can look a little clinical.
The paper template method
Do not drill first. Cut newspaper or wrapping paper to the exact size of each frame, mark the hook position on each sheet, and tape them to the wall with masking tape. Live with it for a day. Move things. When it is right, drill straight through the paper at the marks and tear the sheets away.
This is the difference between one set of holes and five.
A worked example
A five-piece staircase wall in a standard Irish semi:
- Two 8×10″ framed dog portraits
- Two 8×10″ framed landscapes
- One 12×16″ framed horse portrait as the anchor, lowest on the wall
- Oak frames throughout, 6 cm apart, climbing at the stair pitch
At current prices that is €38 + €38 + €38 + €38 + €50 framed, and it fills a stair wall properly. Pick your images in the gallery or start from the horse and dog collections.
Frequently asked
- How much space should there be between frames on a gallery wall?
- Leave 5–8 cm between frames and keep the gap identical throughout. Small prints suit the tighter end of that range, larger framed pieces the wider end.
- How many pictures do you need for a gallery wall?
- Three to five prints suits a stairway or a narrow hall, six to nine suits a wall above a sofa. Odd numbers are easier to balance in a salon layout; even numbers suit a grid.
- Do the frames all have to match on a gallery wall?
- No, but something has to repeat. Either keep one frame finish and vary the images, or vary the frames and keep the subject or treatment consistent — all black and white, for example.
- How do you plan a gallery wall before drilling?
- Cut paper templates the exact size of each frame, mark the hook position on each one, and tape them to the wall for a day. Rearrange until it is right, then drill through the paper at the marks.
More guides
- Wall art room by room: nursery, home office and hallway
Which prints suit a nursery, a home office and a hallway — sizes, subjects, heights and colours for the three rooms people leave until last.
- How to photograph your dog (and get one worth framing)
Practical dog photography tips — get down low, use the right light, freeze movement, keep their attention, and how to tell if a phone photo will print well.
- Irish landscape photography: chasing light in a country with none
How to photograph the Irish landscape in bad light — golden hour, the twenty minutes after rain, blue hour, and which conditions actually print well.